How to: Install OTTP Rotated Mount Stage 1
SaskDelta's :: The Garage :: How To's
Page 1 of 1

How to: Install OTTP Rotated Mount Stage 1
![]() by boostdbalt 2009-12-16, 02:01
by boostdbalt 2009-12-16, 02:01
Never done a mount swap or install before and this took me about 45 mins in my garage with simple tools.
Step 1: Get together your OTTP stage 1 rotated mount setup, a 15 mm and a 18 mm socket, 3/8's drive socket ratchet, 3/8's drive 3 inch extension and some glue (optional, but not anything crazy like super gorilla glue). I'm missing one socket, the 3 inch extension and the glue bc these were all things I used when I started working and needed them.

Step 2: Jack up your car with jack stands or ramps and secure the rear wheels with wood or a brick to keep it from rolling back.

Step 3: Place your jack under your engine, supporting it with wood, and jack the engine up to where the front mount is almost level to the ground. You will also know it is at the right height because when you pull the bolts there will be less strain on them.

Step 4: There are three bolts to remove that require a 18mm socket to get them out, I took out the bolt in the rubber insert first then the ones in the tranny. Once you remove them take out the mount and then put in the OTTP mount. Bolt in the mount to the tranny first, then take the bolt that goes into the rubber insert and see if it lines up with the frame. If it doesn't adjust, then jack up or down to get the holes to line up (don't force it). Take the two washers and place one on each side of the rubber insert and slide the bolt through. Tighten all the bolts down and your done with the front mount.
Bolts circled in red are the ones you remove.

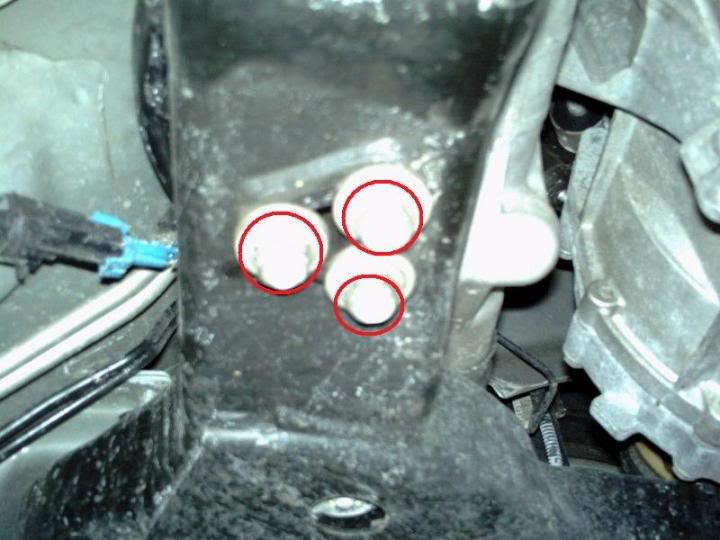
Step 5: Reposition the jack if needed (I didn't need to) and remove the three 18 mm bolts on the tranny(use the extension here for the top and middle bolts if needed). Then disconnect the O2 sensor harness (it makes it easier to maneuver the mount around).
The three bolts are circled in red as well as the o2 harness that is at the top of the mount and easily disconnected. Some of my photo was blocked by the wood I used but you can tell where the bolts are.

Step 6: Using a 15 mm socket remove the three bolts that hold the mount to the frame. After you remove these bolts, take your three hole shim and put a little bit of glue on it (optional..haha). The mount should be able to move around a bit, so lift up on it and line up the shim into the mounts notch that the bolts seat into. Place it in there and then sit the mount back down onto the frame. Re bolt the frame to the mount using the three bolts you just removed. Using one of the bolts you pulled from the tranny, insert it into the middle hole where you pulled it from the mount. If you can bolt this in then do so, if not adjust the jack up or down to get it to go in (don't force it). Insert the remaining two bolts left where you pulled them from.
Step 7: Drop the car and burn rubber
Got How 2 from recklessactn off css
Step 1: Get together your OTTP stage 1 rotated mount setup, a 15 mm and a 18 mm socket, 3/8's drive socket ratchet, 3/8's drive 3 inch extension and some glue (optional, but not anything crazy like super gorilla glue). I'm missing one socket, the 3 inch extension and the glue bc these were all things I used when I started working and needed them.
Step 2: Jack up your car with jack stands or ramps and secure the rear wheels with wood or a brick to keep it from rolling back.
Step 3: Place your jack under your engine, supporting it with wood, and jack the engine up to where the front mount is almost level to the ground. You will also know it is at the right height because when you pull the bolts there will be less strain on them.
Step 4: There are three bolts to remove that require a 18mm socket to get them out, I took out the bolt in the rubber insert first then the ones in the tranny. Once you remove them take out the mount and then put in the OTTP mount. Bolt in the mount to the tranny first, then take the bolt that goes into the rubber insert and see if it lines up with the frame. If it doesn't adjust, then jack up or down to get the holes to line up (don't force it). Take the two washers and place one on each side of the rubber insert and slide the bolt through. Tighten all the bolts down and your done with the front mount.
Bolts circled in red are the ones you remove.
Step 5: Reposition the jack if needed (I didn't need to) and remove the three 18 mm bolts on the tranny(use the extension here for the top and middle bolts if needed). Then disconnect the O2 sensor harness (it makes it easier to maneuver the mount around).
The three bolts are circled in red as well as the o2 harness that is at the top of the mount and easily disconnected. Some of my photo was blocked by the wood I used but you can tell where the bolts are.
Step 6: Using a 15 mm socket remove the three bolts that hold the mount to the frame. After you remove these bolts, take your three hole shim and put a little bit of glue on it (optional..haha). The mount should be able to move around a bit, so lift up on it and line up the shim into the mounts notch that the bolts seat into. Place it in there and then sit the mount back down onto the frame. Re bolt the frame to the mount using the three bolts you just removed. Using one of the bolts you pulled from the tranny, insert it into the middle hole where you pulled it from the mount. If you can bolt this in then do so, if not adjust the jack up or down to get it to go in (don't force it). Insert the remaining two bolts left where you pulled them from.
Step 7: Drop the car and burn rubber
Got How 2 from recklessactn off css

boostdbalt- Members

- Posts : 40
Join date : 2009-12-14
Age : 33
SaskDelta's :: The Garage :: How To's
Page 1 of 1
Permissions in this forum:
You cannot reply to topics in this forum|
|
|